Display DNA: The Art of Building Up
Hello, hello!
Let’s get caught up before I launch into today’s lesson. I’m writing this column en route to Atlanta for my first gift show setup of the season. Atlanta is early this year. The World Cup matches coming to cities across the U.S. have pushed the market to the front of the season. This shift in dates has thrown many of us off. Samples need to arrive earlier, showrooms need to begin setup sooner and, if you’re in this industry, it feels like the winter show season just ended. This season feels odd. It’s not just rushed; it feels a little upside down. But
here we are.
I’ve been honored to speak at several markets this year. In January, I spoke at a buyers’ lunch for Fine Lines. In March, I co-hosted a live session at ASD, and last week I spoke at Seattle Mart. One topic I’ve brought with me is “Show Me Your Store,” where retailers share photos of their stores and ask for advice on everything from window displays to floor planning. I’ve been doing the series on social media for the past year, and it’s become one of my favorite projects. Having the opportunity to do it live has been especially rewarding.
One topic that consistently comes up is how to build up displays. The goal isn’t simply to add height. It’s to create additional selling space. By incorporating multiple levels and surfaces, retailers can showcase more merchandise and create stronger visual impact.
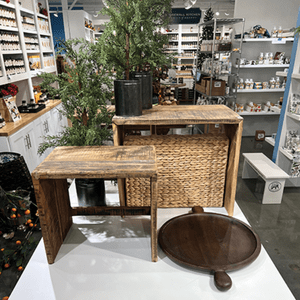
Why does this matter? Single-level displays limit the amount of merchandise you can showcase and often create what I call the “garage sale effect.” Here’s a step-by-step approach to building up your tabletops.
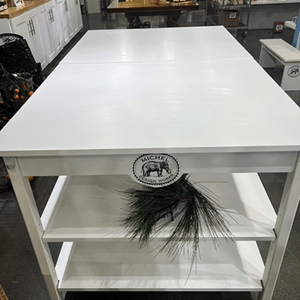
- Start with a clean, bare surface.
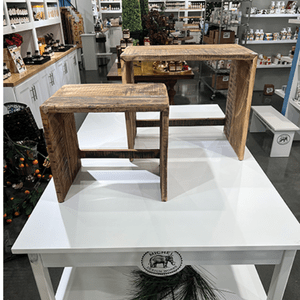
- Place your largest piece first. My favorite pieces to build up with are often nesting tables, which I am using here. This will be your tallest height.
- Add the second-largest piece. Choose something lower and slightly smaller. Position it to the right or left to create balance and establish another merchandising surface.
- Create a visual stop. Because this table is shoppable from 360 degrees, I want to stop the eye from both sides. I don’t want to be able to see straight through to the display on the back, so I will block it with either a plant or, in this case, a basket tray.
- Build up the back side. My third nesting table will be placed in the back, set to the side. In this case, it’s mirroring the front and this will give me space on the table to continue to build up on.
- Add greenery or florals. It’s important to have a green element as these add texture and will create the base of my storytelling. This is a holiday display, and I wanted it to feel less “Christmas” and more “winter,” so I chose a pine tree in a metal bucket. These are your contextualizers and are meant to be background — not the star of the show.
- Ground the display with a tray. When merchandise is placed on a table, it often feels lost. Trays have a great way of calling items out.
- Finish with a tiered piece. My last piece of architecture will be a three-tiered stand. They hold a lot and keep smaller items contained.
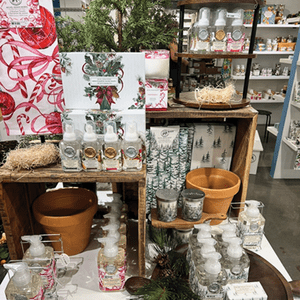
With the architecture in place, it’s time to add merchandise. Here’s the nearly finished display. It’s built for Stonewall Kitchen, and while we’re still waiting on a few samples, the overall concept is clear.
Building up tabletops is a puzzle. Don’t be afraid to experiment with different shapes, heights and materials. The best display pieces support the products they’re holding because effective merchandising always comes back to storytelling.
If you’d like to learn more about building display architecture, check out my June solo episode of The Retail Whore Podcast.